本篇文章主要介绍了在使用linux过程中常见的一些定位问题的命令。
ifconfig(查看网卡) 1 2 3 4 5 6 7 8 9 10 11 12 13 14 15 16 17 18 19 $ ifconfig28 :d2:44 :e b:bd :98 192.168 .0.103 Bcast:192 .168.0 .255 Mask:255.255 .255.0 8 f0c:7825 :8057 :5 eec/64 Scope:Link1500 Metric:1 s:169854 errors:0 dropped:0 overruns:0 frame:0 s:125995 errors:0 dropped:0 overruns:0 carrier:0 s:0 txqueuelen:1000 s:174146270 (174.1 MB) TX bytes:21062129 (21.0 MB)lo Link encap:Local Loopback 127.0 .0.1 Mask:255.0 .0.0 1 /128 Scope:Host65536 Metric:1 s:15793 errors:0 dropped:0 overruns:0 frame:0 s:15793 errors:0 dropped:0 overruns:0 carrier:0 s:0 txqueuelen:1 s:2898946 (2.8 MB) TX bytes:2898946 (2.8 MB)
如果要显示所有的网络接口,包含在线(up)的或下线(down)的,使用-a 选项。
如果要给一个网络接口分配一个IP地址,使用下面的命令
1 $ sudo ifconfig eth0 192.168.56 .5 netmask 255.255.255.0
如果要启用一个网络接口,使用下面命令
如果要禁用一个网络接口,使用下面命令
1 $ sudo ifconfig down eth0
ip(查看网卡) 显示所有网卡
1 2 3 4 5 6 7 8 9 10 11 12 13 14 15 16 17 18 19 1 : lo: <LOOPBACK,UP,LOWER_UP> mtu 65536 qdisc noqueue state UNKNOWN group default qlen 1000 link /loopback 00 :00 :00 :00 :00 :00 brd 00 :00 :00 :00 :00 :00 inet 127.0.0.1 /8 scope host lovalid_lft forever preferred_lft foreverinet6 ::1 /128 scope host valid_lft forever preferred_lft forever2 : eth0: <BROADCAST,MULTICAST,UP,LOWER_UP> mtu 1500 qdisc mq state UP group default qlen 1000 link /ether 52 :54 :00 :eb:2 b:9 b brd ff:ff:ff:ff:ff:ffinet 10.168.1.4 /24 brd 10.168.1.255 scope global eth0valid_lft forever preferred_lft foreverinet6 fe80::5054 :ff:feeb:2 b9b/64 scope link valid_lft forever preferred_lft forever3 : eth1: <BROADCAST,MULTICAST,UP,LOWER_UP> mtu 1500 qdisc mq state UP group default qlen 1000 link /ether 20 :90 :6 f:6 a:7 f:ae brd ff:ff:ff:ff:ff:ffinet6 fe80::2290 :6 fff:fe6a:7 fae/64 scope link valid_lft forever preferred_lft forever4 : docker0: <NO-CARRIER,BROADCAST,MULTICAST,UP> mtu 1500 qdisc noqueue state DOWN group default link /ether 02 :42 :76 :73 :f4:f6 brd ff:ff:ff:ff:ff:ff
查看路由信息
1 2 3 4 5 6 7 8 [root@VM_1_4_centos ~] # ip route show10 .168 .1 .1 dev eth0 10.168.1.0 /24 dev eth0 proto kernel scope link src 10 .168 .1 .4 10.168.100.3 dev enic3c3d718fcd scope link 10.168.100.11 dev enib229b17365d scope link 169.254.0.0 /16 dev eth0 scope link metric 1002 169.254.32.0 /28 dev docker0 proto kernel scope link src 169 .254 .32 .1 linkdown 172.16.3.64 /26 dev cbr0 proto kernel scope link src 172 .16 .3 .65
ifup,ifdown(激活或者禁用网卡) ifup命令用于激活一个网络接口,使得可以接收或传输数据。
ifdown命令可以禁用一个网络接口,禁掉后就不能传输和接收数据了。
ping(探测网络连通性) 1 2 3 4 [root@VM_1_4_centos ~]# ping www.baidu.comPING www.a.shifen.com (14.215.177.38) 56(84) bytes of data.from 14.215.177.38 (14.215.177.38): icmp_seq =1 ttl =54 time =3.30 msfrom 14.215.177.38 (14.215.177.38): icmp_seq =2 ttl =54 time =3.15 ms
发送指定数量的包
1 2 3 4 5 6 7 8 9 10 [root@VM_1_4_centos ~]# ping -c 4 www.baidu.comPING www.a.shifen.com (14.215.177.38) 56(84) bytes of data.from 14.215.177.38 (14.215.177.38): icmp_seq =1 ttl =54 time =3.59 msfrom 14.215.177.38 (14.215.177.38): icmp_seq =2 ttl =54 time =3.16 msfrom 14.215.177.38 (14.215.177.38): icmp_seq =3 ttl =54 time =3.19 msfrom 14.215.177.38 (14.215.177.38): icmp_seq =4 ttl =54 time =3.14 ms ping statistics ---
traceroute(查看数据包路由途径) 1 2 3 4 5 6 [root@VM_1_4_centos ~]106.55 .165.251 (106.55 .165.251 ), 30 hops max, 60 byte packets1 9.31 .61.129 (9.31 .61.129 ) 1.033 ms 1 .954 ms 1 .574 ms 2 9.31 .123.96 (9.31 .123.96 ) 0.831 ms 1 .058 ms 1 .319 ms 3 9.31 .123.105 (9.31 .123.105 ) 0.763 ms 1 .330 ms 1 .052 ms 4 106.55 .165.251 (106.55 .165.251 ) 0.504 ms 0 .524 ms 0 .555 ms
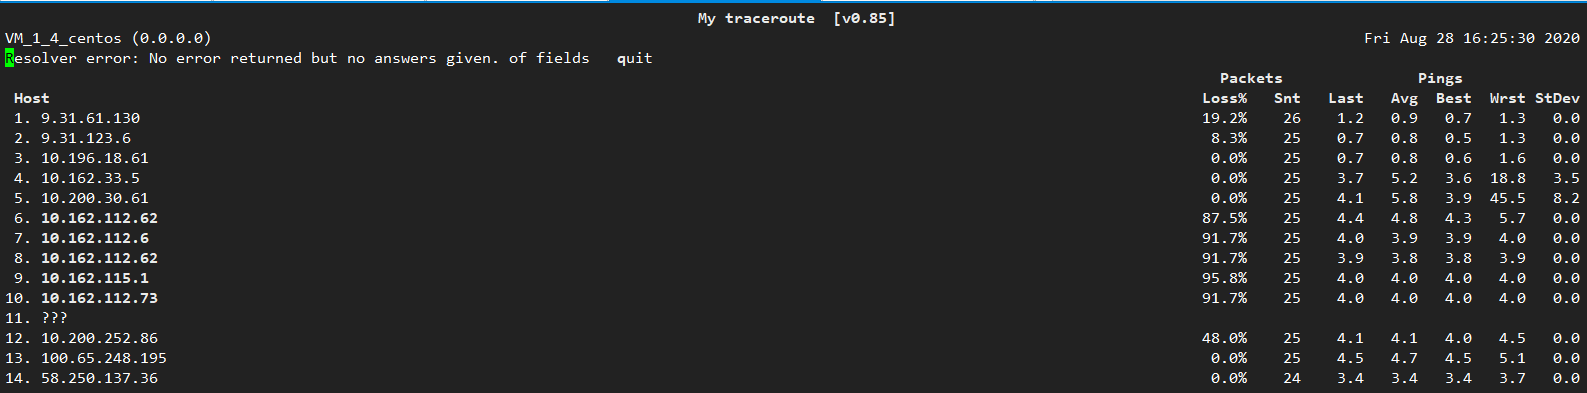
mtr(ping+traceroute)
route(查看路由表) 1 2 3 4 5 6 7 8 9 10 [root@VM_1_4_centos ~] # route 0 .0 .0 .0 UG 0 0 0 eth010.168.1.0 0 .0 .0 .0 255 .255 .255 .0 U 0 0 0 eth010.168.100.3 0 .0 .0 .0 255 .255 .255 .255 UH 0 0 0 enic3c3d718fcd10.168.100.11 0 .0 .0 .0 255 .255 .255 .255 UH 0 0 0 enib229b17365d0 .0 .0 .0 255 .255 .0 .0 U 1002 0 0 eth0169.254.32.0 0 .0 .0 .0 255 .255 .255 .240 U 0 0 0 docker0172.16.3.64 0 .0 .0 .0 255 .255 .255 .192 U 0 0 0 cbr0
添加一个网络路由到一个路由表:
1 $ sudo route add -net <network ip/cidr> gw <gateway ip> <interface>
从路由表中删除特定的路由项:
1 $ sudo route del -net <network ip/cidr>
netstat(查看连接数) 查看某个服务的TCP连接数
1 # netstat -an | grep ESTABLISHED | grep 126 :80 | wc -l
查看udp的连接数
查看网卡列表
1 2 3 4 5 6 7 8 9 10 11 [root@VM_1_4_centos ~] 1500 421966834 0 0 0 478598834 0 0 0 BMPRU 1500 0 0 0 0 7 0 0 0 BMU 1500 3399766 0 0 0 5942984 0 0 0 BMRU 1500 1187714 0 0 0 1188197 0 0 0 BMRU 1500 945294724 0 0 0 695281730 0 0 0 BMRU 1500 8390504 0 0 0 4818989 0 0 0 BMRU 65536 6202712 0 0 0 6202712 0 0 0 LRU 1500 10 0 0 0 10516 0 0 0 BMRU
显示组播组的关系
1 2 3 4 5 6 7 8 9 1 ALL -SYSTEM S.MCAST.NET1 ALL -SYSTEM S.MCAST.NET1 ff02::1 1 ff02::1 :ff0a:b0c1 ff02::1
显示网络统计信息
1 2 3 4 5 6 7 8 9 10 11 184695 total packets received 0 forwarded 0 incoming packets discarded 184687 incoming packets delivered 143917 requests sent out 32 outgoing packets dropped 30 dropped because of missing route 676 ICMP messages received
显示监听的套接口
1 2 3 4 5 6 7 8 9 10 11 Active Internet connections (only servers)Proto Recv-Q Send-Q Local Address Foreign Address State tcp 0 0 0.0.0.0 :ssh 0.0.0.0 :* LISTEN tcp 0 0 VM_1_4_centos:33437 0.0.0.0 :* LISTEN tcp 0 0 VM_1_4_centos:50050 0.0.0.0 :* LISTEN tcp 0 0 VM_1_4_centos:10248 0.0.0.0 :* LISTEN tcp 0 0 0.0.0.0:46313 0.0.0.0 :* LISTEN tcp 0 0 VM_1_4_centos:10249 0.0.0.0 :* LISTEN tcp 0 0 0.0.0.0 :sunrpc 0.0.0.0 :* LISTEN tcp6 0 0 [::]:30099 [::]:* LISTEN
ss(检测套接字) 1 2 3 4 5 6 7 8 9 10 11 12 13 14 15 $ ss -ta 0 128 *:ssh *:* 0 32768 127.0.0.1:33437 *:* 0 32768 127.0.0.1:50050 *:* 0 32768 127.0.0.1:10248 *:* 0 64 *:46313 *:* 0 32768 127.0.0.1:10249 *:* 0 128 *:sunrpc *:* 0 0 172.16.3.65:48682 172.16.3.75:websm 0 0 172.16.252.1:54536 172.16.252.1:https 0 0 10.168.1.4:46820 169.254.128.15:60002 0 0 10.168.1.4:ssh 163.177.68.35:11123 0 0 10.168.1.4:51178 169.254.0.71:http 0 0 172.16.252.1:45940 172.16.252.1:https
显示所有活动的TCP连接以及计时器,运行以下命令:
ncat(nc) ncat/nc既是一个端口扫描工具,也是一款安全工具,还是一款监测工具,甚至可以做为一个简单的TCP代理。 由于有这么多的功能,它被誉为是网络界的瑞士军刀。
1 yum install nmap-ncat -y
监听某个端口的入站连接
连接远程服务器执行命令
1 2 3 4 5 6 7 8 9 10 11 12 13 14 15 16 17 18 ncat IP_address port_number@VM-6-17-centos ~]<html> <head> <title> 400 Bad Request</title> </head> <body> <center> <h1> 400 Bad Request</h1> </center> <hr> <center> nginx/1.16.1</center> </body> </html>
测试主机端口的连通性
1 2 3 4 [root@VM-6 -17 -centos ~]# ncat -v 49.235.179.157 22 Ncat: Version 7.50 ( https://nmap.org /ncat )Ncat: Connected to 49.235 .179 .157 :22. -2.0 -OpenSSH_7.4
nc进行主机间通信聊天
1 2 3 4 5 [root@VM_0_13_centos ~]# ncat 42.194.143.131 8081 @VM_1_4_centos ~]# ncat -l 8081
nmap(扫描主机) 扫描www.niewx.club这个地址的状态
1 2 3 4 5 6 7 8 9 10 11 12 13 14 15 16 17 [root@VM_1_4_centos ~]for www.niewx.club (49.235.179.157)done : 1 IP address (1 host up) scanned in 80.76 seconds
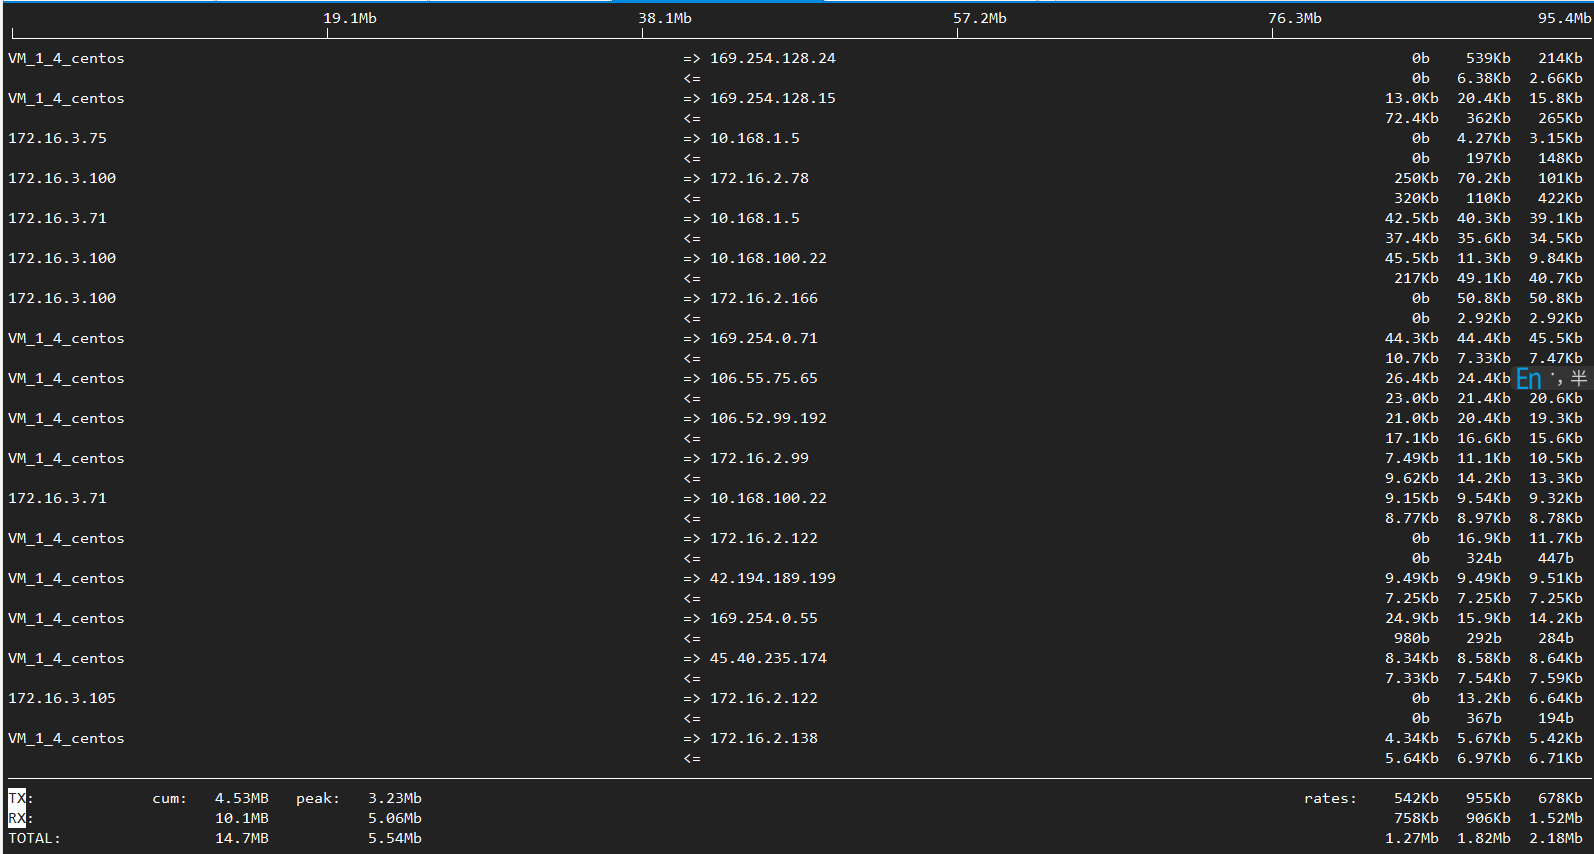
iftop(查看流量) -i: 接口
-B: 以字节而非比特显示
TX:发送流量
RX:接收流量
TOTAL:总流量
Cumm:运行iftop到目前时间的总流量
peak:流量峰值
rates:分别表示过去 2s 10s 40s 的平均流量
trickle(限制带宽) 这个应用用于限制网络带宽
限制wget的上传和下载速度限制上传为10KB/S,下载为20KB/s
1 # trickle -u 10 -d 20 wget http://mirrors.163.com/centos/7/isos/x86_64/CentOS-7-x86_64-Minimal-1503-01.iso
单独限制某个进程的下载和上传速度
1 # trickle -s -d 50 -u 25 ftp
限制终端下的所有命令带宽为,下载500KB/S,上传250KB/s;
1 2 # trickle -s -d 500 -u 250 bash
dstat(监控cpu内存) 1 2 3 4 5 6 7 8 9 10 11 12 13 14 15 yum install dstat -y 0 0 | 8 2 90 0 0 0|6769M 1226M 6870M 661M|0.61 0.50 0.46|2.85 23.7 2 2 95 0 0 0|6777M 1226M 6870M 653M|0.56 0.49 0.45| 0 25.0 6 1 93 0 0 0|6771M 1226M 6870M 659M|0.56 0.49 0.45| 0 9.00 7 1 92 0 0 0|6771M 1227M 6870M 659M|0.56 0.49 0.45| 0 32.0 3 1 96 0 0 0|6771M 1227M 6870M 659M|0.56 0.49 0.45| 0 5.00 2 1 97 0 0 0|6772M 1227M 6870M 658M|0.56 0.49 0.45| 0 35.0
tcpdump(网络抓包) 1 2 3 4 5 6 7 8 9 10 11 12 13 14 15 16 17 18 19 20 21 22 23 24 25 tcpdump [ -adeflnNOpqStvx ] [ -c 数量 ] [ -F 文件名 ] [ -i 网络接口 ] [ -r 文件名] [ -s snaplen ] [ -T 类型 ] [ -w 文件名 ] [表达式 ] a 将网络地址和广播地址转变成名字;dd 将匹配信息包的代码以c语言程序段的格式给出;i 指定监听的网络接口;p : 将网卡设置为非混杂模式,不能与host或broadcast一起使用0 表示包不截断,抓完整的数据包。默认的话 tcpdump 只显示部分数据包,默认68 字节。16 进制和ASCII的形式显示),这在进行协议分析时是绝对的利器。
抓取包含10.10.10.122的数据包
1 # tcpdump -i eth0 -vnn host 10.10.10.122
抓取包含10.10.10.0/24网段的数据包
1 # tcpdump -i eth0 -vnn net 10.10.10.0/24
抓取包含端口22的数据包
1 # tcpdump -i eth0 -vnn port 22
抓取udp协议的数据包
1 # tcpdump -i eth0 -vnn udp
抓取icmp协议的数据包
1 # tcpdump -i eth0 -vnn icmp
抓取arp协议的数据包
1 # tcpdump -i eth0 -vnn arp
抓取ip协议的数据包
1 # tcpdump -i eth0 -vnn ip
抓取源ip是10.10.10.122数据包。
1 # tcpdump -i eth0 -vnn src host 10.10 .10.122
抓取目的ip是10.10.10.122数据包
1 # tcpdump -i eth0 -vnn dst host 10.10.10.122
抓取源端口是22的数据包
1 # tcpdump -i eth0 -vnn src port 22
抓取源ip是10.10.10.253且目的ip是22的数据包
抓取源ip是10.10.10.122或者包含端口是22的数据包
1 # tcpdump -i eth0 -vnn src host 10.10 .10.122 or port 22
抓取源ip是10.10.10.122且端口不是22的数据包
抓取源ip是10.10.10.2且目的端口是22,或源ip是10.10.10.65且目的端口是80的数据包。
1 # tcpdump -i eth0 -vnn \( src host 10.10.10.2 and dst port 22 \) or \( src host 10.10.10.65 and dst port 80 \)
抓取源ip是10.10.10.59且目的端口是22,或源ip是10.10.10.68且目的端口是80的数据包。
1 [root@localhost ~]# tcpdump -i eth0 -vnn 'src host 10.10.10.59 and dst port 22' or ' src host 10.10.10.68 and dst port 80 '
把抓取的数据包记录存到/tmp/fill文件中,当抓取100个数据包后就退出程序。
1 # tcpdump –i eth0 -vnn -w /tmp/ fil1 -c 100
从/tmp/fill记录中读取tcp协议的数据包
1 # tcpdump –i eth0 -vnn -r /tmp/ fil1 tcp
从/tmp/fill记录中读取包含10.10.10.58的数据包
1 # tcpdump –i eth0 -vnn -r /tmp/ fil1 host 10.10 .10.58
curl(发送请求) 也可以保存源码 用curl -O 文件名 url,这个和wget类似
1 curl -O baidu.txt wwww.baidu .com
显示网页头部信息 用-i,当然也会把网页信息显示出来
1 2 3 4 5 6 7 8 9 10 11 12 13 14 15 16 17 [root@VM_0_11_centos training ]HTTP/1.1 200 OK Accept-Ranges: bytes Cache-Control: private, no -cache, no -store, proxy-revalidate, no -transform Connection: keep-alive Content-Length: 2381 Content-Type: text/html Date: Thu, 02 Apr 2020 02:14:33 GMT Etag: "588604c8-94d" Last-Modified: Mon, 23 Jan 2017 13:27:36 GMT Pragma: no -cache Server: bfe/1.0.8.18 Set-Cookie: BDORZ=27315; max-age=86400; domain=.baidu.com; path=/ <!DOCTYPE html> xxx </html>
参数 -v可以显示通信的过程:
1 2 3 4 5 6 7 8 9 10 11 12 13 14 15 16 17 18 19 20 21 22 [root@VM_0_11_centos training ]* About to connect() to www.baidu.com port 80 (#0) * Trying 180.101 .49 .11 ... * Connected to www.baidu.com (180.101.49.11) port 80 (#0) > GET / HTTP/1.1 > User-Agent: curl/7.29.0 > Host: www.baidu.com > Accept: */* > < HTTP/1.1 200 OK < Accept-Ranges: bytes < Cache-Control: private, no -cache, no -store, proxy-revalidate, no -transform < Connection: keep-alive < Content-Length: 2381 < Content-Type: text/html < Date: Thu, 02 Apr 2020 02:16:36 GMT < Etag: "588604c8-94d" < Last-Modified: Mon, 23 Jan 2017 13:27:36 GMT < Pragma: no -cache < Server: bfe/1.0.8.18 < Set-Cookie: BDORZ=27315; max-age=86400; domain=.baidu.com; path=/ <
更详细的通信信息可以用 参数 –trance 文件名 url,具体信息保存到单独的文件中
1 [root@VM_0_11_centos training]# curl --trace info.txt www.baidu.com
htpp的动词,例如GET POST,PUT,DELETE等,需要参数 -X
curl默认的是get请求,如果发送POSt请求
1 curl -X POST www.baidu.com
发送表单的时候,GET很简单 只需要把数据拼接到url后面就行
1 curl www.baidu.com?data =xxx&data1=xxx
POST也不难
1 curl -X POST --data "data=xxx" example.com/form .cgi
POST发送请求的数据体可以用-d
1 2 3 $ curl -d'login=emma&password=123' -X POST https://g oogle.com/login'login=emma' -d 'password=123' -X POST https://g oogle.com/login
使用-d参数以后,HTTP 请求会自动加上标头Content-Type : application/x-www-form-urlencoded。并且会自动将请求转为 POST 方法,因此可以省略-X POST。-d参数可以读取本地文本文件的数据,向服务器发送。
1 $ curl -d '@data.txt' https://g oogle.com/login
上面命令读取data.txt文件的内容,作为数据体向服务器发送。
1 2 3 4 <form method ="POST" enctype ='multipart/form-data' action ="upload.cgi" > <input type =file name =upload > <input type =submit name =press value ="OK" > </form >
curl上传就应该是:
1 curl --form upload =@localfilename --form press =OK [URL]
–referer参数表示的是你从哪个页面来的
1 [root@VM_0_11_centos training] # curl --ref erer www.baidu.com www.baidu.com
User Agent字段,这个字段表示的是客户端设备的信息,服务器可能会根据这个User Agent字段来判断是手机还是电脑
1 2 3 4 5 6 7 8 curl --user-agent " xx" urlU ; CPU iPhone OS 4_3_3 like Mac OS X; en -us ) Version /5.0.2 Mobile/8J2 Safari/6533.18.5U ; CPU iPhone OS 4_3_3 like Mac OS X; en -us ) Version /5.0.2 Mobile/8J2 Safari/6533.18.5" www.baidu.com
–user-agent 可以用-A或者-H来替代
–cookie参数,使用–cookie可以携带cookie信息
1 2 3 curl --cookie "name=xxx" URL
增加头部信息 –header
1 curl --header "Content-Type:application/json" http:// example.com
参考链接 https://www.jianshu.com/p/39b9d66c9dbf
https://www.toutiao.com/i6812988437512061452/ https://www.toutiao.com/i6850221908475003405/