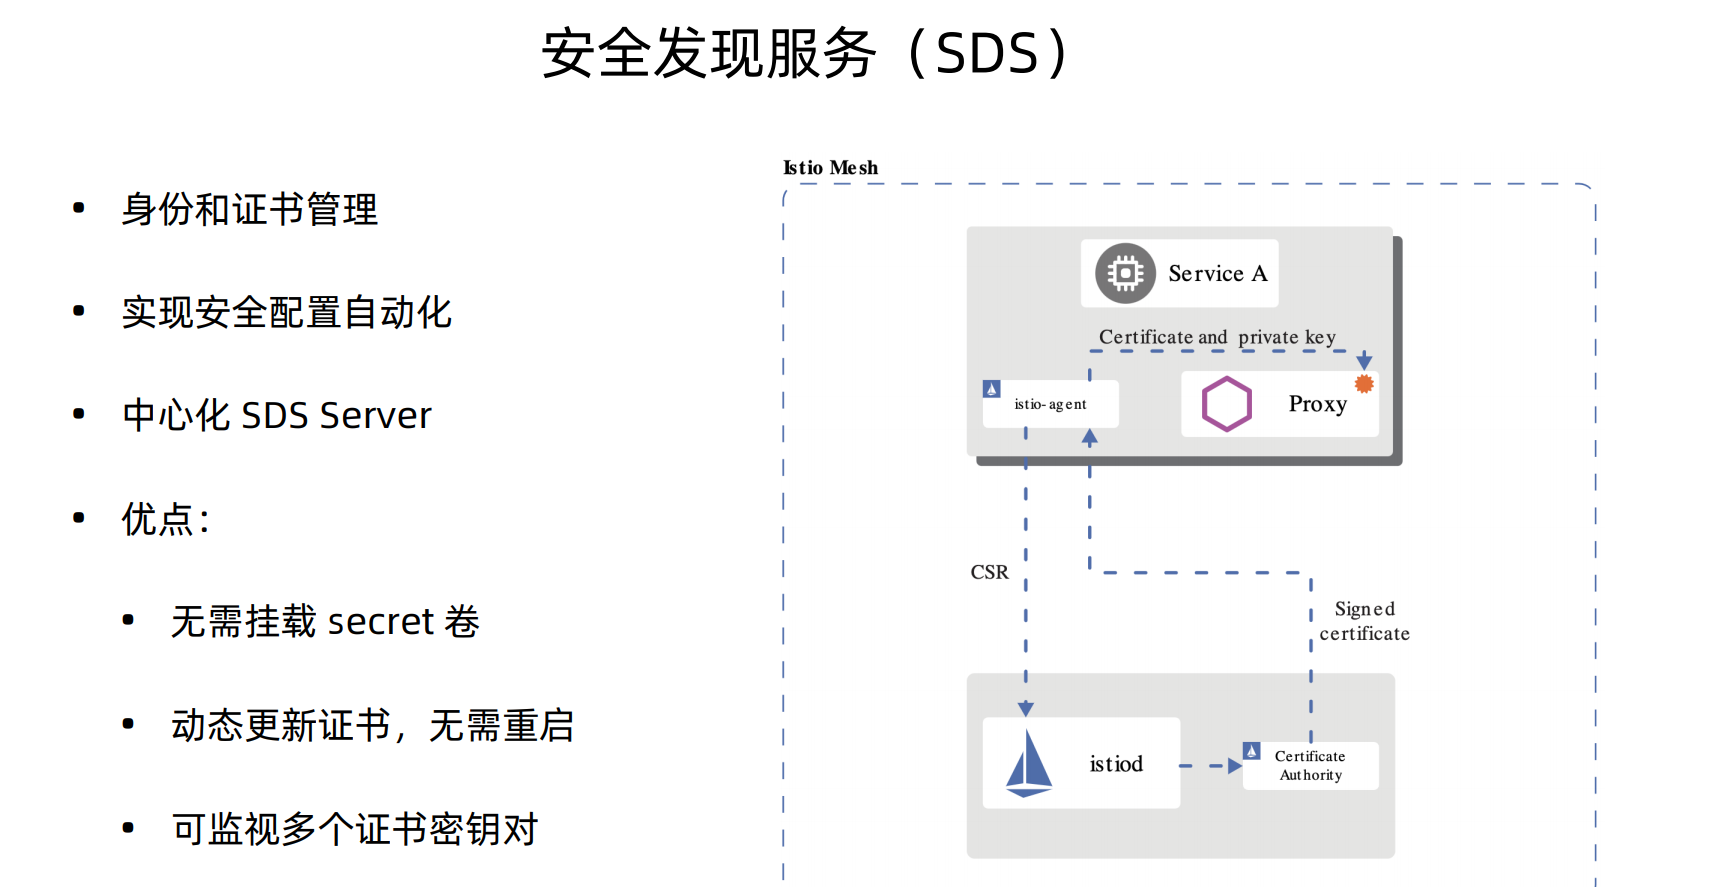
Istio的自动双向TLS特性,您只需配置认证策略即可使用双向 TLS,而无需关注目标规则。
Istio 跟踪迁移到 sidecar 的服务端工作负载,并将客户端 sidecar 配置为自动向这些工作负载发送双向 TLS 流量, 同时将明文流量发送到没有 sidecar 的工作负载。这使您可以通过最少的配置,逐步在网格中使用双向 TLS。
istio1.5版本的安全认证默认是使用的SDS(安全发现服务),并且这个服务趋于稳定、默认开启
单向认证
首先我们生成一下所需要证书秘钥
1
2
3
4
5
6
| 1.为服务创建根证书和私钥:
openssl req -x509 -sha256 -nodes -days 365 -newkey rsa:2048 -subj '/O=example Inc./CN=example.com' -keyout example.com.key -out example.com.crt
2.为httpbin.example.com创建证书和私钥:
openssl req -out httpbin.example.com.csr -newkey rsa:2048 -nodes -keyout httpbin.example.com.key -subj "/CN=httpbin.example.com/O=httpbin organization"
openssl x509 -req -days 365 -CA example.com.crt -CAkey example.com.key -set_serial 0 -in httpbin.example.com.csr -out httpbin.example.com.crt
|
部署一下httpbin这个服务,之前部署就可以不用部署了
1
2
3
4
5
6
7
8
9
10
11
12
13
14
15
16
17
18
19
20
21
22
23
24
25
26
27
28
29
30
31
32
33
34
35
| apiVersion: v1
kind: Service
metadata:
name: httpbin
labels:
app: httpbin
spec:
ports:
- name: http
port: 8000
selector:
app: httpbin
---
apiVersion: apps/v1
kind: Deployment
metadata:
name: httpbin
spec:
replicas: 1
selector:
matchLabels:
app: httpbin
version: v1
template:
metadata:
labels:
app: httpbin
version: v1
spec:
containers:
- image: docker.io/citizenstig/httpbin
imagePullPolicy: IfNotPresent
name: httpbin
ports:
- containerPort: 8000
|
接下来给网关配置一个secret来挂载这个证书
1
| kubectl create -n istio-system secret tls httpbin-credential --key=httpbin.example.com.key --cert=httpbin.example.com.crt
|
配置ingress网关
1
2
3
4
5
6
7
8
9
10
11
12
13
14
15
16
17
18
19
| kubectl apply -f - << EOF
apiVersion: networking.istio.io/v1alpha3
kind: Gateway
metadata:
name: mygateway
spec:
selector:
istio: ingressgateway
servers:
- port:
number: 443
name: https
protocol: HTTPS
tls:
mode: SIMPLE #单向TLS
credentialName: httpbin-credential
hosts:
- httpbin.example.com
EOF
|
给httpbin配置一个VirtualService
1
2
3
4
5
6
7
8
9
10
11
12
13
14
15
16
17
18
19
20
21
22
| kubectl apply -f - << EOF
apiVersion: networking.istio.io/v1alpha3
kind: VirtualService
metadata:
name: httpbin
spec:
hosts:
- "httpbin.example.com"
gateways:
- mygateway
http:
- match:
- uri:
prefix: /status
- uri:
prefix: /delay
route:
- destination:
port:
number: 8000
host: httpbin
EOF
|
下面我们执行这条命令测试一下
1
| curl -v -HHost:httpbin.example.com --resolve httpbin.example.com:443:127.0.0.1 --cacert example.com.crt "https://httpbin.example.com:443/status/418"
|
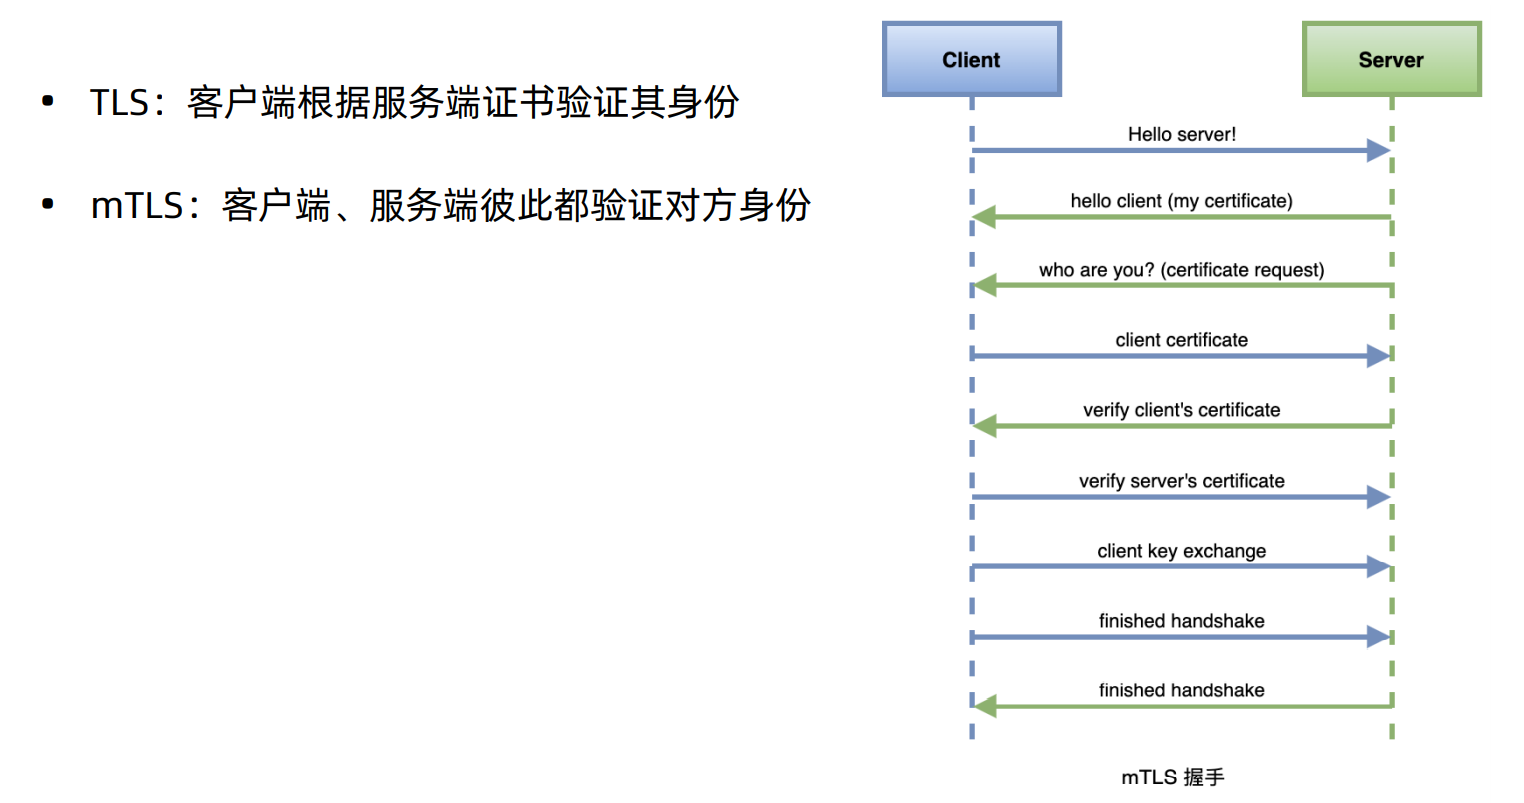
双向认证
借助 Istio 的自动双向 TLS 特性,您只需配置认证策略即可使用双向 TLS,而无需关注目标规则。
Istio 跟踪迁移到 sidecar 的服务端工作负载,并将客户端 sidecar 配置为自动向这些工作负载发送双向 TLS 流量, 同时将明文流量发送到没有 sidecar 的工作负载。这使您可以通过最少的配置,逐步在网格中使用双向 TLS
我们创建一个testauth的ns,在里面部署一下sleep服务,然后去请求default下的httpbin服务。
1
2
3
4
5
6
7
8
9
10
11
12
13
| [root@VM-0-13-centos istio-1.5.1]# kubectl create ns testauth
namespace/testauth created
[root@VM-0-13-centos istio-1.5.1]# kubectl apply -f samples/sleep/sleep.yaml -n testauth
serviceaccount/sleep created
service/sleep created
deployment.apps/sleep created
[root@VM-0-13-centos istio-1.5.1]# k get pod -n testauth
NAME READY STATUS RESTARTS AGE
sleep-5b7bf56c54-8gt4q 1/1 Running 0 21s
[root@VM-0-13-centos istio-1.5.1]# kubectl exec -it sleep-5b7bf56c54-8gt4q -n testauth -c sleep -- curl http://httpbin.default:8000/ip
{
"origin": "127.0.0.1"
}
|
这里默认是可以访问通的,因为我们还没配置双向tls认证,下面我们来配置下认证策略
1
2
3
4
5
6
7
8
9
10
| kubectl apply -f - <<EOF
apiVersion: "security.istio.io/v1beta1"
kind: "PeerAuthentication"
metadata:
name: "default"
namespace: "default" #基于default下的一个对等认证
spec:
mtls:
mode: PERMISSIVE #兼容模式
EOF
|
兼容模式下默认是可以访问的
1
2
3
4
| [root@VM-0-13-centos istio-1.5.1]# kubectl exec -it sleep-5b7bf56c54-8gt4q -n testauth -c sleep -- curl http://httpbin.default:8000/ip
{
"origin": "127.0.0.1"
}
|
下面我们把对等认证模式改成严格模式
1
2
3
4
5
6
7
8
9
10
| kubectl apply -f - <<EOF
apiVersion: "security.istio.io/v1beta1"
kind: "PeerAuthentication"
metadata:
name: "default"
namespace: "default"
spec:
mtls:
mode: STRICT #严格模式
EOF
|
再执行访问请求就会被拒绝
1
2
3
| [root@VM-0-13-centos istio-1.5.1]
curl: (56) Recv failure: Connection reset by peer
command terminated with exit code 56
|
那么如何让sleep去访问到httpbin呢,我们只需要将sleep注入到istio就可以,因为istio会去管理证书和秘钥
1
2
3
4
5
6
7
8
9
10
11
12
| [root@VM-0-13-centos istio-1.5.1]
serviceaccount/sleep unchanged
service/sleep unchanged
deployment.apps/sleep configured
[root@VM-0-13-centos istio-1.5.1]
NAME READY STATUS RESTARTS AGE
sleep-5b7bf56c54-8gt4q 1/1 Terminating 0 10m
sleep-68dc95bf4c-fwftq 2/2 Running 0 38s
[root@VM-0-13-centos istio-1.5.1]
{
"origin": "127.0.0.1"
}
|
将sleep服务注入到istio中,就可以访问到httpbin的服务了,我们上面是针对ns进行对等认证的策略配置,也可以进行全局的对等认证的配置,只需要将ns去掉就行。
1
2
3
4
5
6
7
8
9
| kubectl apply -f - <<EOF
apiVersion: "security.istio.io/v1beta1"
kind: "PeerAuthentication"
metadata:
name: "default"
spec:
mtls:
mode: STRICT
EOF
|