istio入门系列之实战入门准备flux自动化部署

本章我们学习下如何通过Flux来进行CI/CD的代码自动发布。

学习Flux之前,我们需要进行如下准备工作。

upload-image

flux的具体实现流程如下

upload-image

flux的安装

首先下载最新的fluxctl客户端安装

1
2
3
[root@VM-0-13-centos ~]# wget https://github.com/fluxcd/flux/releases/download/1.21.0/fluxctl_linux_amd64
[root@VM-0-13-centos ~]# cp fluxctl_linux_amd64 /usr/local/bin/fluxctl
[root@VM-0-13-centos ~]# chmod +x /usr/local/bin/fluxctl

下面我们给flux创建一个命名空间用来部署

1
kubectl create ns flux

下载flux的部署yaml,部署到k8s集群中

1
2
3
4
5
6
7
8
# git clone https://github.com/fluxcd/flux.git
# cd flux/deploy
# kubectl apply -f .
# kubectl get pod -n flux
NAME READY STATUS RESTARTS AGE
flux-7d79bc76f4-5xjvn 1/1 Running 0 26s
memcached-5bd7849b84-z99wt 1/1 Running 0 26s

在flux的flux-deployment.yaml配置你的仓库信息

1
2
3
4
5
6
7
8
9
10
11
12
13
14
15
16
17
18
19
20
21
22
23
24
25
26
27
[root@VM-0-13-centos deploy]# cat flux-deployment.yaml | grep git
- name: git-key
secretName: flux-git-deploy
- name: git-keygen
# file, which you will need to do if you host your own git
# repo rather than using github or the like. You'll also need to
# https://docs.fluxcd.io/en/latest/guides/use-private-git-host
- name: git-key
- name: git-keygen
# Include this if you want to supply HTTP basic auth credentials for git
# name: flux-git-auth
# https://$(GIT_AUTHUSER):$(GIT_AUTHKEY)@github.com/user/repository.git
- --git-url=git@github.com:nieweixing/smdemo.git
- --git-branch=master
# to those under the following relative paths in the git repository
# - --git-path=subdir1,subdir2
- --git-label=flux-sync
- --git-user=nieweixing
- --git-email=nwx_qdlg@163.com
# Include these two to enable git commit signing
# - --git-gpg-key-import=/root/gpg-import
# - --git-signing-key=<key id>
# Include this to enable git signature verification
# - --git-verify-signatures
# - --git-readonly
# Instruct flux where to put sync bookkeeping (default "git", meaning use a tag in the upstream git repo)
# - --sync-state=git

也可以在部署flux的时候通过命令来部署

1
2
3
4
5
fluxctl install \
--git-user=xxx \
--git-email=xxx@xxx \
--git-url=git@github.com:malphi/smdemo \
--namespace=flux | kubectl apply -f -

主要配置–git-url、–git-user、–git-email这3个配置项,让flux可以管理你的仓库,下面我们把flux的公钥配置的flux的代码仓库中

1
2
[root@VM-0-13-centos deploy]# fluxctl identity --k8s-fwd-ns flux
ssh-rsa AAAAB3NzaC1yc2EAAAADAQABAAABgQClmQxfR+HHs7nVwVUtxnr34KBhPIWdexBjhtfKEzdIt/B8eJNKBWF/K2wTJIajyDwj/VctdIBn3/5rf+l98zPbuMQp08ejJvi1d1XYiweohg9Zj6VAYDHdEOc3cqEO34J9+eVoCexB8lkBK9AFg9urpdSVHnqNj1ApDGOH8xpnl98V+DsoPrqCv6bGTGpYNIpSIZMv5OImjTANH1yF5lgxL6blOBv7eAGKikHBo6vN46BzTQHtvcMZGK7SatiroaU+qw7fQw1Gf3s0c0dAuZqDzL97rSDfKYkvFWTg0UQajD4qnmeWx/Mm5GCFN10wTF3OloYXLC1bAS3jmcH6EEpWLaSuQj4ennfzZkxC6tRPiM9ncSDeR8oKGQ2O89honUfXMHW7UYtyRPyzN89X6ySp25cwU+R7Jm9cf4DXmeS1XWVGUewHOQGmBN3X8471nC31CJxqI8n6zuReuyql+w7BVM/s6cELgcLLqRRC2POyacgqOw2n3jVK//id/h+TBYU= root@flux-7d79bc76f4-5xjvn

upload-image

flux部署demo应用

下面我们给demo部署创建一个新的ns来进行部署,并自动注入istio

1
2
3
4
[root@VM-0-13-centos deploy]# k create ns demo
namespace/demo created
[root@VM-0-13-centos deploy]# k label namespace demo istio-injection=enabled
namespace/demo labeled

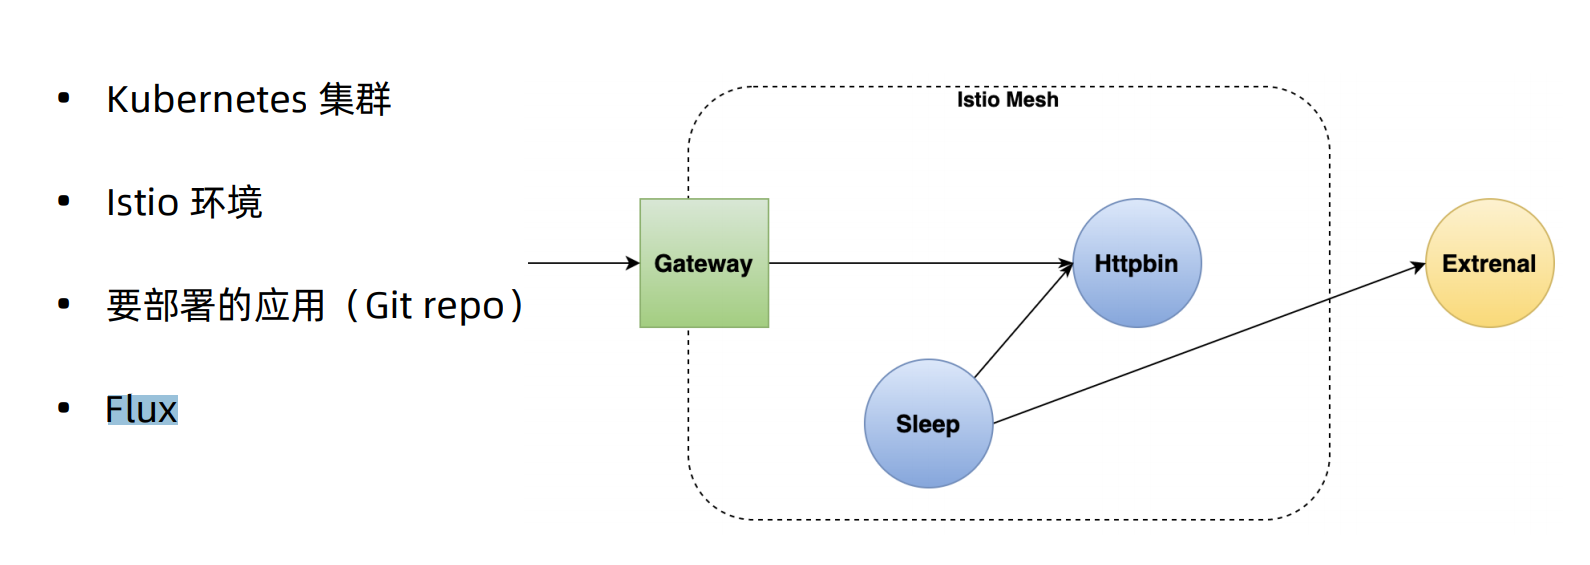
下面我们通过flux来进行demo服务的部署,首先将部署的yaml文件上传到smdemo的仓库中

upload-image

1
2
3
4
5
6
7
8
9
[root@VM-0-13-centos ~]# fluxctl sync --k8s-fwd-ns flux
Synchronizing with ssh://git@github.com/nieweixing/smdemo.git
Revision of master to apply is eb8f408
Waiting for eb8f408 to be applied ...
Done.
[root@VM-0-13-centos ~]# kubectl get pod -n demo
NAME READY STATUS RESTARTS AGE
httpbin-66cdbdb6c5-78df6 2/2 Running 0 3m47s
sleep-5b7bf56c54-5ngkp 2/2 Running 0 3m47s

执行flux sync后,demo应用的httpbin和sleep就部署到了demo命名空间下,下面我们来进行测试下httpbin服务是否可以访问通

1
2
3
4
[root@VM-0-13-centos ~]# kubectl exec -it sleep-5b7bf56c54-5ngkp -n demo -c sleep -- curl http://httpbin.demo:8000/ip
{
"origin": "127.0.0.1"
}

通过上面的访问结果可以看出,我们的demo应用已经通过flux正常部署到了k8s中。


istio入门系列之实战入门准备flux自动化部署
https://www.niewx.cn/2020/12/08/2020-12-08-Getting-started-in-actual-combat-of-istio-entry-series/
作者
VashonNie
发布于
2020年12月8日
许可协议